Are you ready to take your Arial view content from “meh” to magnificent? Flying a drone is an absolute blast, but the real magic happens once you land and open your laptop. If you’ve ever looked at a professional drone photo and wondered why yours doesn’t have that same explosive “pop,” you are in the right place.
We are diving deep into the high-energy world of drone post-production to turn your raw captures into Arial view cinematic masterpieces! And hey, if you find yourself overwhelmed by the technical grind, Outsourceimage is your ultimate partner to handle the heavy lifting, ensuring every frame you deliver is world-class.
1. The Foundation: Why Your Edit Starts Before You Take Off -Arial view
Listen up, because this is the “Golden Rule” of drone cinematography: a great edit starts in the air. You can’t bake a five-star cake with bad ingredients, and you can’t create a stunning image with “clipped” data.
- The Power of RAW (DNG) and Flat Profiles: Get out of JPEG mode! Shooting in RAW (DNG) format is a total game-changer because it preserves significantly more data than a compressed JPEG. It gives you the “latitude” to rescue shadows and highlights that would otherwise be lost. Pair this with a “flat” color profile (like DJI’s D-LOG). It might look grey and boring on your screen, but it’s actually a superpower that captures the widest possible dynamic range.
- Mastering the Exposure Triangle and AEB: To get professional results, you must master the Exposure Triangle: Shutter Speed, Aperture, and ISO. Keep your ISO as low as possible (usually 100) to avoid digital noise. To really level up, use Auto Exposure Bracketing (AEB). By taking a 5-shot bracket, you capture a massive range of light that can be merged into a single, detail-rich HDR image.
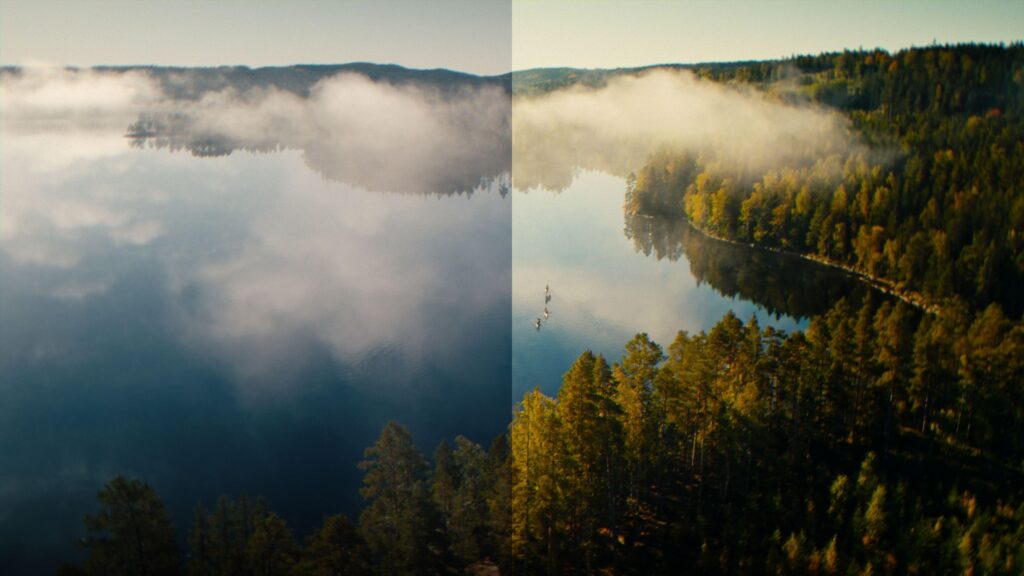
2. Professional Color Correction: The “Blacks-First” Workflow -Arial view
Color correction is the “secret ingredient” that separates the hobbyists from the elite pros. It’s about balancing light and achieving a natural, vibrant look.
- The Pro Order of Operations: Professional colorists have a specific rhythm. Instead of sliding bars randomly, start by “crushing the blacks“ (the shadows). This establishes an immediate baseline of contrast that gives your image depth. Once your shadows are locked in, move to the highlights to ensure your sky isn’t “blown out,” and finally, use the midtones to balance the overall exposure.
- Saturation with Style: We all want that eye-popping look, but don’t go overboard. Keep saturation moderate so your image doesn’t look “surreal” or fake. If this technical balancing act feels like a chore, Outsourceimage provides the expert colorist touch your footage deserves.
3. Fixing the “Wide Angle Trap”: Geometry and Perspective -Arial view
Have you ever noticed that buildings in your drone shots look like they are “leaning backward”? That’s not a ghost; it’s lens distortion. Because drone cameras use wide-angle lenses, structures often appear warped.
- The Guided Upright Magic: In Adobe Lightroom, the Guided Upright tool (found in the Transform panel) is your best friend. Simply draw vertical lines along the “ribs” of a building, and the AI instantly snaps the structure back to a perfect, straight-up-and-down perspective. It’s like magic for architectural photography.
4. Beyond the Single Frame: Panoramas and Tiny Planets -Arial view
Why settle for one frame when you can have the whole horizon?
- High-Res Manual Stitching: Skip the drone’s built-in “Auto-Pano” feature if you want professional quality. By manually taking overlapping shots (aim for 30% to 50% overlap), you can stitch them in post to create massive files—sometimes over 13,000 pixels wide! Use Boundary Warp to stretch those edges and fill the frame without losing a single pixel of detail.
- The “Tiny Planet” Transformation: Want to go viral? Create a “Tiny Planet”! By taking a full 360-degree panorama, making it a square in Photoshop, and applying the Polar Coordinates filter, you wrap the world into a seamless sphere.
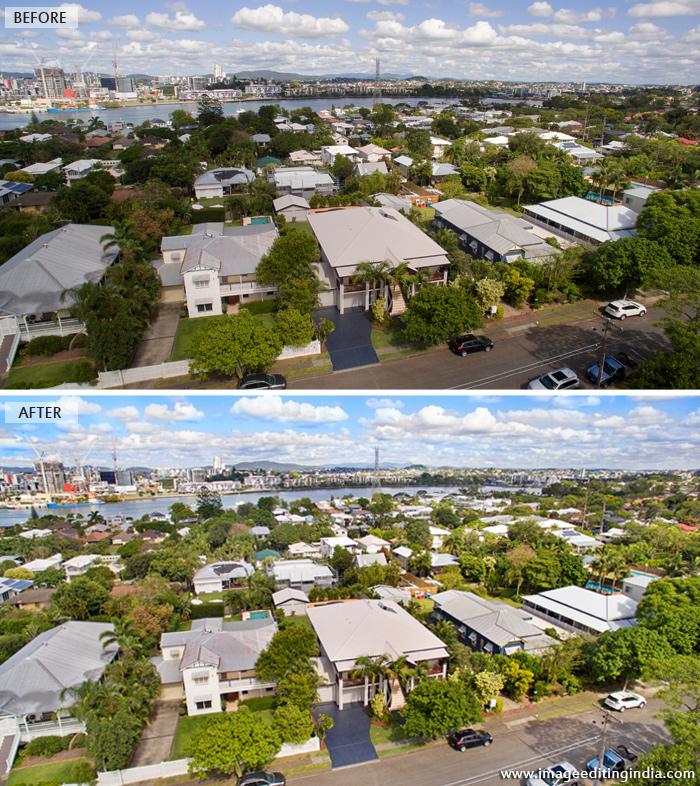
5. Advanced Restoration: Dehazing and Sharpening -Arial view
Aerial photos taken from high altitudes often look “washed out” due to atmospheric dust and moisture.
- Clearing the Haze: The Dehaze tool is essential for revealing the “true impact” of your photo.
- Precision Sharpening: To combat the natural softness of small drone sensors, use a High Pass Filter in Photoshop. By setting the radius to 2-5 pixels and changing the blend mode to Overlay, you define the edges of your image with laser-like precision.
- Sky Replacement: Sometimes the weather doesn’t cooperate. Photoshop’s Sky Replacement tool allows you to swap a boring sky for a stunning sunset. Just remember to adjust the color temperature of the ground to match the new sky!
6. The New Frontier: Ethics, AI, and Accuracy- Arial view
As we move into a world of “Generative AI,” the ethics of editing are more important than ever.
- Artistic Vision vs. Authenticity: While we love creative expression, over-editing can lead to a misrepresentation of reality. A pro tip for maintaining trust? Be transparent about your process.
- The Science of Uncertainty (VBLE-xz): The future of image restoration isn’t just about looking “pretty”—it’s about accuracy. New methods like VBLE-xz are being used to restore blur and noise while quantifying “uncertainty.” This is a massive value-add for commercial clients in surveying or inspection who need to know exactly how reliable an image is.
Conclusion: Elevate Your Vision Today!
Mastering drone cinematography is an exhilarating journey of discovery. From the initial flight settings to the final High Pass sharpen, every step is an opportunity to express your unique vision.
Remember, if the post-production process feels like a mountain you aren’t ready to climb, Outsourceimage is here to ensure your footage reaches its peak potential. We handle the technical “heavy lifting” so you can focus on what you love—flying and creating!
5 FAQs: How Outsourceimage Specialized Editing Services Solve Your Needs
Q1: I have issues with my drone sensor showing “muddy” shadows; can Outsourceimage help?
A: Absolutely! Our specialized editing division uses advanced “blacks-first” workflows and HDR merging to rescue muddied shadows and restore the full dynamic range of your aerial captures.
Q2: Can Outsourceimage fix distorted architectural photos where buildings look warped?
A: Yes! Our experts use professional tools like the Guided Upright tool and Lens Profile Corrections to ensure every building in your shot stands perfectly straight, providing professional-grade geometric precision.
Q3: Does Outsourceimage offer solutions for “blown out” or boring skies in my photography?
A: We do! We provide natural-looking Sky Replacement services. We don’t just “paste” a new sky; we meticulously adjust the color and lighting of the entire scene to ensure the new sky blends perfectly with your original landscape.
Q4: Can Outsourceimage create those “Tiny Planet” 360-degree effects for me?
A: Most definitely! Our team is skilled in the complex Polar Coordinates and Liquify workflows required to turn a standard 360-degree panorama into a high-resolution “Tiny Planet” masterpiece.
Q5: Why should I choose Outsourceimage for my drone editing needs?
A: Choosing Outsourceimage means choosing reliability and quality. Just as you trust professionals to maintain your most valuable equipment, drone pilots trust us to keep their businesses soaring by delivering professional-grade color correction, dehazing, and sharpening that stands out in the marketplace.
Leave a Reply